Tag: roof

Architecture & Building

How to add roof a overhang

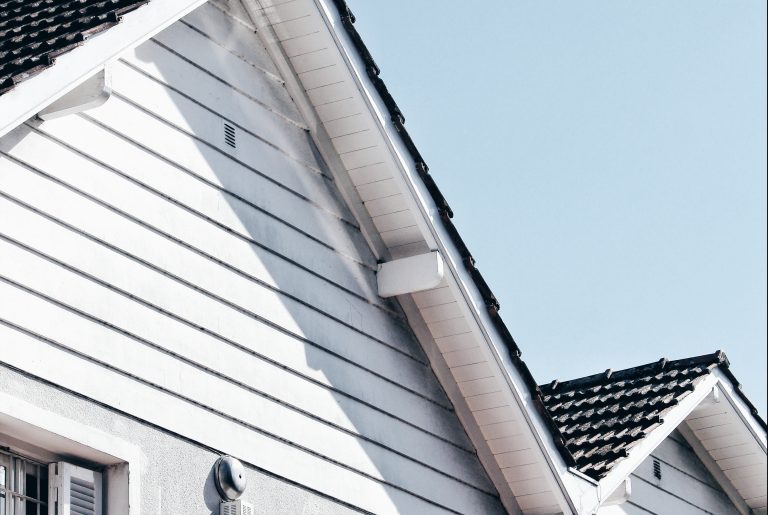
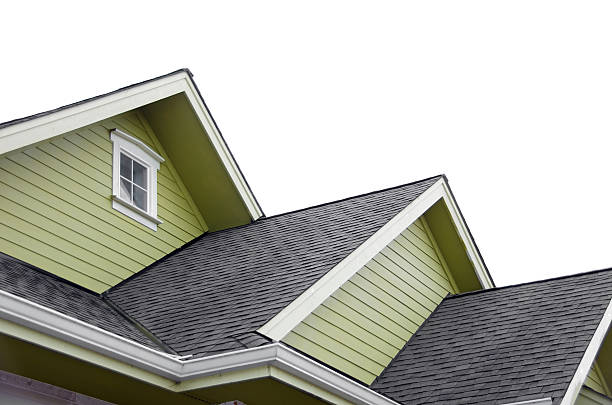
A roof overhang also known as eaves protects the building under it from rain and weather. The overhanging edge of the roof also gives extra shade to the windows, preventing glare and heat from entering the home. Adding an overhang isn’t a very difficult job. However, blending the new overhang into the existing roof requires some expertise.  

Accessing the roof –  

Firstly, start by taking off the existing fascia and any other trim that covers the rafter tails. Once the rafter tails and top of the wall plate are exposed, you should be able to see into the loft.  

Extending the rafters –  

Secondly, cut the rafter extensions three times the length of the overhang you want to add. Then, position the rafter extension against the existing rafter. Make sure that two-thirds of their length overlap’s the rafters, defining the overhang. You should nail an extension to each rafter spaced 6 to 8 inches apart. The overhang should be 2 feet or less to ensure it would be stable.  

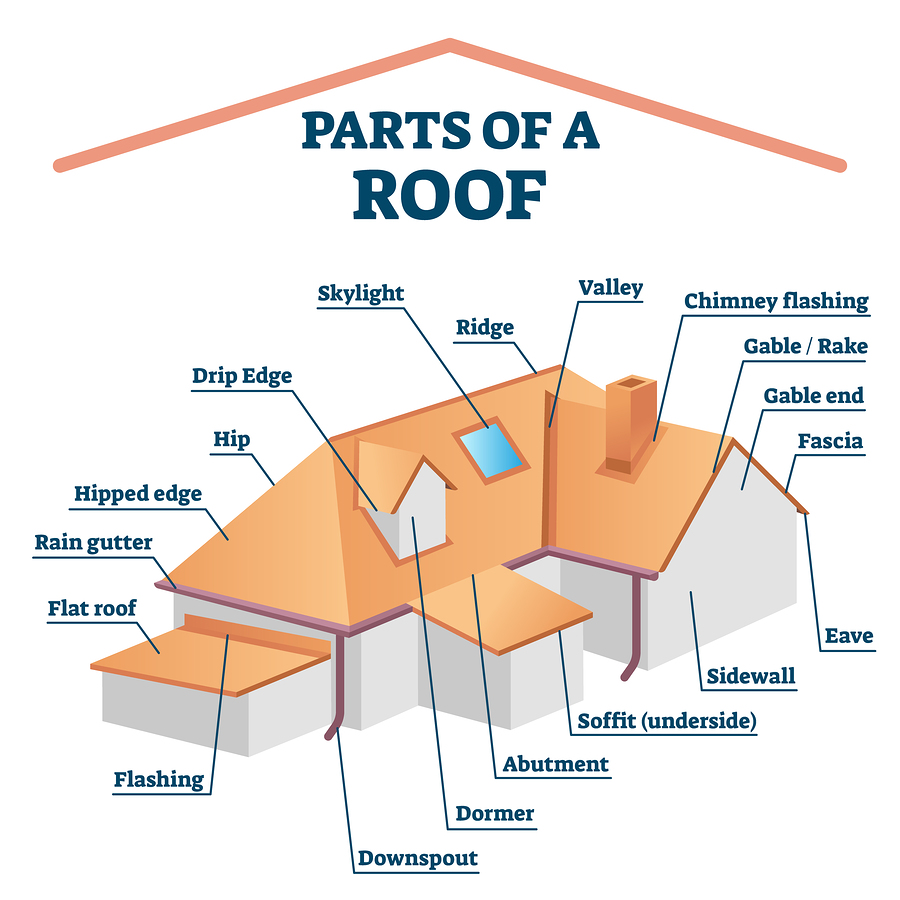
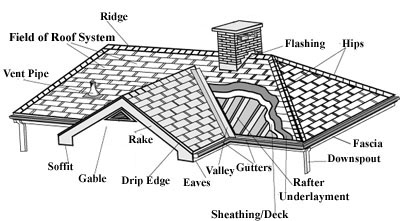
Installing fascia’s and soffits –  

Once the new overhang is on you can then start the fascia and soffit installation. Attach a new two-by-four sub-fascia board along the ends of the new rafter tails. The fascia board is nailed it the rafter and usually has a lip for the soffit boards to slot into. To build a soffit, attach a two by four nailer board to the wall of the building, making it level with the bottom of the fascia.  

Adding the roof to the overhang –  

Once the overhangs are framed, you need to cover the rafter extensions with a fresh layer of plywood sheathing. The best way to integrate the new overhang into the roof is to remove the underlay and shingles from the entire roof and put new ones on. If you use new shingles, the new overhangs will disappear into the roof. If you don’t want to reroof, then you’ll have to settle for a less than perfect blend. Your biggest problem may be finding roof shingles to match the ones on your house.   

Contact us

Advice Center

An informative step-by-step guide to installing a roof

This step-by-step guide will show you how to install a roof. It will also list tools and items that you would need during this project.  

List of tools required –  

  • Caulk gun 
  • Air compressor 
  • Circular saw 
  • Roof harness  
  • Roofing Nailer 
  • Scaffolding  
  • Stapler  
  • Utility knife  
  • Cordless drill 
  • Tape measure  
  • Chalk line 

List of materials required –  

  • Felt underlay  
  • Asphalt shingles  
  • Roofing nails  
  • Drip edge  
  • Hook blades  
  • Sealant 
  • Waterproof underlay  
  • Staples  
  • Step and dormer flashing  
  • Valley flashing  
  • Vent flashing  

Step 1: installing the ventilation system  

A rafter roll is usually laid across the eaves and is designed to guide fresh air into the roof. It also allows air to circulate around the space to prevent dampness.   

What is a rafter roll? 

A rafter roll is a glass mineral wool roll. Designed for use in warm roofs where the roof is insulated at rafter level. It offers excellent thermal performance.  

Make sure the rafter roll comes out above any pre-installed insulation. If you don’t the insulation will block the airflow.  

Step 2: installing underlay  

To protect the roof against ice, wind, and rain you should install a good underlay. You need to make sure the underlay you have chosen meets the building regulation requirements for your project. So, to install the underlay you should start on the right side of the roof and tack it into place. Depending on your ventilation system, you may need to leave a gap at the ridge of the roof to allow air to circulate effectively.  

Step 3: putting in the battens and tiles  

You will need to determine the first fix point on the roof for your tiles, and that’s where the top of your first batten will sit. In addition, make sure you use the right size timber batten for your roof tiles. Line up the top of the batten with the chalk line and fix with a nail to every rafter. After that, to keep the ridge batten secure you must use batten straps to keep it in place.  

What is a batten?  

A Batten is a small section of timber or steel that provides a means of supporting, positioning, or fixing roof cladding and ceiling sheets. A Tile batten is parallel to the eaves line and at right angles to the rafters to which tiles are fixed

Next, you should lay your first line of tiles across the roof. Then, make sure that you have a minimum of one nail per tile and two nails per tile around the perimeters. You should time from right to left, depending on the interlock of the tile.  

Finally step 4: adding the roof ridge 

You should place your ridge membrane in a straight line across the ridge batten. Once it’s secured all along the ridge, it’s time to screw the ridge tiles to the ridge batten. Finally, when that is completed, you can install a ridge-to-ridge seal to offer extra strength to the ridge.  

Contact us

Architecture & Building

Understanding the anatomy of a roof part 2

When it comes to the roof of your home, there are quite a few components. Here you can gain an understanding of all of the details that make up a roof.   

Fascia –  

Firstly, a fascia is the attractive board along the side of the overhang and helps your roof appear finished. They are used to secure the gutters to the roof and keep them in place. Fascias also block water from penetrating the roof deck and coming into your home.  

How is a fascia attached? The fascia board is nailed to the rafter feet and usually has a rebate or lip for the soffit boards to slot into. They are then either fixed to a batten that is attached to the brickwork or sat on top of the last course of brickwork.  

Soffit –  

The soffit is the part of the overhang where your roof meets your siding. When rain or snow hits your roof, it runs down, and the overhang allows the water to flow away from your house. Soffit outlining the roofline allows for continuous ventilation and is one of the most effective ways to ventilate a loft.  

Where is the soffit on a house? The soffit is the material beneath the eave that connects the far edge of your roof to the exterior wall of your house. Besides being underneath your eaves, soffits can also be on the underside of a porch.  

Gutters –  

Guttering is a small thin trough that is used to collect water from your roof and completes the roofing protection system. It is used to direct rainwater away from the base of the building which helps protect the foundation. For a house to be complete, it needs a gutter system to function properly.  

Downspout –  

A downspout is a lightweight tube that extends vertically from the gutter trough to the ground. They exist to direct excess rainwater away from your home in a controlled manner. In addition, it is an important element of any gutter system that helps prevent soil erosion and damage to the property’s foundation.  

Flashing –  

Finally, flashing is a crucial roofing material that every roof needs to have. It is a sheet of thin metal material used to prevent water penetration or seepage into a building. Without flashing a roof would almost certainly develop leaks in sensitive areas.  

Contact us

Materials

The two types of green roofs: extensive vs intensive

If you’re interested in installing green roofs but are unsure of the different types, this blog is perfect for you. Carry on reading to understand the difference between extensive and intensive.  

Extensive green roof –

What are extensive green roofs?  

They are designed to be low-maintenance, lightweight systems with no general access. Typically, they have thin layers of the substrate to keep depth and weight to a minimum.  

The substrate depth of extensive green roofs is smaller than that found in intensive roofs, usually around 100-150mm. Because of their shallowness, extensive green roofs usually provide aesthetic ad environmental purposes. Rather than functioning as accessible roof space.  

Usually, extensive roofs use sedum vegetation due to its ability to flourish in harsh environments. They are able to withstand weather, especially wind, droughts, flooding, and extremely high or low temperatures.  

How to get the vegetation on the roof –  

Extensive green roof installations often come ready-made. They are rolled up in mats containing 10-22mm of growing medium and vegetation, meaning that it’s easily transportable to the installation site. These mats are usually laid upon another shallow layer of growing medium, which is then placed on the filter sheet and protection mat.  

The cost of extensive green roofs –  

This type of green roof tends to be a lot cheaper to buy and install compared to the intensive green roof. It is also often one of the most popular choices for residential properties because they are much lighter. They cost around £50 – £100 per square meter, however, they cost £75 on average.  

Green roofs - advantages a handful of the most important information

Intensive green roofs –  

What is an intensive green roof?  

They consist of much deeper substrates which give far greater scope to design and grow more complicated and elaborate gardens onto concrete structures. Intensive green roofs involve intense landscaping. They are suited to roofs with a highly visible presence or public access. 

The substrate depth of intensive green roofs is at the very least 120mm, and usually over 200mm, making it a lot deeper than the extensive. Because the substrate depth is deeper, they are able to support more vegetation. Such as: 

  • Flower beds 
  • Trees 
  • Shrubs 
  • Lawns 
  • Water features  
  • Benches  
  • Gravel paths  

Intensive green roofs are intended to replicate what can typically be found at ground level in the natural landscape, and in places such as parks and gardens. In fact, they are often referred to as roof gardens or parks.  

The cost of intensive – 

They are the more expensive type of roof; this is because they resemble conventional gardens. The maintenance and the running costs will be higher than extensive. They can also be highly expensive to install because they require elaborate drainage systems.  

Intensive green roofs can cost between £60 – £200, however, they average around £130.  

Architecture & Building

Understanding All Of The Details Of A Roof

When it comes to the roof of your home, there are quite a few components. Here you can gain an understanding of all of the details that make up a roof.  

What is a ridge?  

Firstly, the ridge is defined as the highest point on a roof, often referred to as the peak. It is a horizontal line running the length of the roof where the two planes meet. 

A ridge beam is a necessary structural member that carries half of the roof load and must be used when building roofs with slopes less than 3/12.  

 If you are thinking of installing a loft conversion, you must measure from the floor to the ridge height to see if you have a minimum head height of 2.2 m.  

What is a hip?  

A hip roof has no vertical ends. It is sloped on all sides, with the slopes meeting in a peak. The hip is the external angle at which adjacent sloping sides of a roof meets.  

The hip provides the ideal protection from the weather, like heavy rain, snow, and high winds. This is because the sides are sloped towards the ground so the weather can slide off and makes the building more stable.  

Rafters –  

A rafter is a structural component that is used as a part of the construction. Typically, it runs from the ridge or hip of the roof to the wall plate of the external wall. Rafters contain two main outer beams which support the structure. In addition, they are usually laid side-by-side, providing a base to support roof decks and coverings. 

Valley –  

A valley is a gutter-like valley that runs between two sloped sections. They are used so that the rainwater has somewhere to escape.  

Although just like gutters, valleys undergo a fair amount of wear over time. They can leak, rust, and get blocked up; however, the repairs are a common situation and easy to fix.  

They are typically made of lead, concrete, or fiberglass. Although, aluminum is now growing in popularity, as a lightweight and rust-resistant alternative to older iron/ steel valleys.  

Rakes –  

The rake refers to the slanting edge of a gable roof at the end wall of the house. This f is most common in colder climates and consists of two sections sloping in opposite directions from the peak to allow for the best flow of water off the roof.  

They are important because they help keep your roof dry and they serve the important function of preventing water from getting into the fascia.  

Shingles –  

Finally, shingles are coverings consisting of individual overlapping elements. These elements are typically flat, rectangular shapes laid in courses from the bottom edge of the roof up. With each course overlapping the joints below.  

Roofing Terms | Brothers Roofing NJ

Contact us

Extensions

Everything you should know before building a Flat roof

Flat roof extensions can provide a simple, cost-effective solution that ticks all of the right boxes. Especially for smaller extensions.  

What is a flat roof? 

A flat roof is a roof that is completely or almost level. However, whilst they are described as flat almost all flat roofs are laid to slope so that rainwater can run off to the lower side. The slope of the roof is properly known as its pitch. 

Where flat roofs originally from –  

Flat roofs are an ancient form mostly used in desert climates. Flat roofs exist all over the world, and each area has its own tradition or preference for the materials used. For hotter climates, where there is less rainfall many flat roofs are simply built out of masonry or concrete. This is because it is good at keeping the heat out, it is cheap and easy to build. Flat roofs are characteristic of the Egyptian, Persia, and Arabian styles of architecture.   

The main thing flat roofs are used for is extensions. They are exceedingly popular with those looking to create a cool, modern home. Flat roofs help to free up internal space and are often cheaper than a pitched roof. It is also easier to incorporate a green roof onto the structure if you want to go for an eco-friendly version.  

Pros and cons of flat roofs –  

Pros  

  • Installation & Maintenance – flat roofs are fairly easy to install. The maintenance is also easy because there is no fear of sliding off the roof when it comes to fixing it or cleaning the gutters.  
  • Price – the flat roof is generally a less expensive option. A flat roof requires less materials for the construction, and the materials are cheaper than tiles. They also take less tome to install.  
  • Internal space is not imposed on – the lack of pitch means that you don’t have to extend your property upwards, and maybe block some views. You can also put things on top of the roof and create a roof top garden  

Cons  

  • Temperature change – flat roofs absorb heat easier than flat roofs, because they are constantly absorbed by the sun. In the summer this can make your house very hot, however, in the winter it does the opposite and makes your house cold.  
  • Roof repairs – they are usually more expensive than a traditional pitched roof.  
  • Drainage – flat roof drainage is not as effective as pitched roofs and flooding can become an issue.  

Contact us

Architecture & Building

What are eaves in architecture?

What are eaves in a house?  

The area where a roof extends a small way past the wall of a building is usually referred to as the eaves. The term ‘eaves’ typically refers to the combination of soffit and fascia that adorn the overhang of a roof. 

Types of eaves –  

There are four basic types: 

  • Exposed – the finished underside of the roof and supporting rafters are visible from the underneath.  
  • Soffit – includes a soffit – the panelling which forms the underside of the eaves, connecting the bottom tip of the eave with the side of the building at a 90-degree angle.  
  • Boxed in – encases the roof rafters but meets the side of the building at the same angle as the roof pitch. 
  • Abbreviated – cut off almost perpendicular with the side of the building.  

Are eaves the same as soffits?  

To summarise the difference between the two, the eave is an area of the roof which overhangs the walls, whereas the soffit is the underside component of this area. In the widest sense, soffits can refer to the underside of almost anything that’s constructed, including arches and porches. An eave is part of a roof system and a soffit is part of the eave. In simple terms, eaves and soffits are two different parts of the same structure.  

Why do you need them?  

They can define the style of a home, and they also have a major function. They can protect the siding and foundation of a structure. A roof’s eaves sticking out beyond the sides allow snow and rain to fall from the roof away from the sides and to the ground. This can prevent leakage-related damage to the building façade.  

Eaves can also provide shading to windows, helping to maintain comfortable internal conditions. In the winter the low sun is able to enter through the windows to warm the interior. Whereas, in summer, they prevent direct sunlight from entering your home.  

How much does it cost to replace eaves on a house?  

The average cost to repair roof eave damage can be anywhere between £345 – £1000. However, most people pay around £675 to have a carpenter repair a 30 linear feet section of the soffits and fascia damaged by moisture or insects. The maximum cost of roof eaves can go up to £3,100.  

17,507 Eaves Stock Photos, Pictures & Royalty-Free Images - iStock

Contact us

Design and Inspiration

The Top 7 Best And Most Useful Types Of Roofs

Gable Roofs  

Firstly, gable roofs are one of the most common types of roofs in colder climates. It consists of two sections whose upper horizontal edges meet to form its ridge. In regions with strong winds and heavy rain, gable roofs are built with a steep pitch in order to present to prevent the ingress of water.    

They are recognised by their triangular shape. 

Gable roofs are friendly to all types of materials. However, if they contain hips and valleys, consider using metal shingles or standing seams to avoid leaks.  

Advantages: 

  • Inexpesnive    
  • Are based on simple design principle 
  • More weather-resistant than flat roofs  
  • The loft can be turned into living  space  

Disadvantages: 

  • Gable roofs are more prone to wind damage than hip roofs   
  • Gable roofs can collapse if frames are not constructed properly 
Gable Roof - What It Is, Pros/Cons and Variations - Homenish

Mansard roof   

Secondly, A mansard roof is a four-sided gambrel-style hip roof. It has two slopes on each side. Punctured by dormer windows, at a steeper angle than the upper. This type of roof with windows creates additional floor and living space.  

Pros:  

  • The mansard style makes maximum use of the interior space of the loft  
  • A simple mansard roof is rather cheap  
  • Extra living space adds value to the house  

Cons  

  • A typical mansard can be costly  
  • A low pitched mansard roof is not recommended for use in places with high rainfall 

Hip roofs 

Thirdly, a hip roof is a type of roof where all sides slope downwards to the walls. They usually have four sides like a mansard roof, often shaped like a pyramid. There are three types of hip roofs: simple hip, crossed hip, and half-hipped. However, simple hip roofs are the most common.  

Pros:  

  • Durable and sturdy  
  • It is excellent for windy areas  
  • Offers extra living space  

Cons: 

  • Expensive and complex 
  • Can develop water leaks if not well installed 
  • Requires extra maintenance 
Hip Roof: The Ultimate in Modern Roof Design - Worst Room

Shed roof  

A shed roof is a single sloping roof attached to a taller wall. A shed roof doesn’t have any adjoining roofs. And can be installed on an independent building or leaned into an already existing one.   

They are mostly used for home additions and are getting popular with modern home roofing. This roof is used for eco-friendly houses.

Pros:  

  • Suitable for rain regions 
  • Less expensive
  • Allows natural light  
  • Easy to assemble 

Cons: 

  • When the pitch is too high, the ceiling becomes low. 
  • Not suitable for areas with high wind 
Mercury Small House Plan | Modern Shed Roof Home Design with Photos

Gambrel roof  

 A gambrel roof has two different slopes, one side is almost vertical steep slope while the other slope is lower. This design provides the advantages of a sloped roof while maximising headroom inside the building’s upper level. Gambrel roofs are also getting popular in modern builds.  

Pros  

  • It allows extra living space 
  • Easy construction 
  • Less expesnice  
  • Provides more storage 

cons 

  • Regular maintenance 
  • Needs to be water proof at the ridges 
  • Not usefull in high wind areas  
  • Windows may increase the chances of leaks 

Flat roof  

Flat roofs are often not 100% flat, there is a slight slope that allows water to run off. They also have centrally located drains and gutters to get rid of the rainwater on top of the roof. Flat roofs are common to commercial and industrial buildings. Flat roofs are often used in warmer climates, which allows the roof space to be used as a living space.

Pros:  

  • Less expensive to construct 
  • Suitable for installing solar panals when constructing an eco friendly house  

Cons:  

  • Not suitable for high rainfall areas  
  • Frequent maintence and repairs  
Flat Roofs: The Good and The Bad | Central Bay Roofing & Restoration

Bonnet roof  

Finally, bonnet roofs are like a reverse mansard roof. They have double slopes, the lower slopes are at a lesser angle than the upper slopes. In addition, if you have an open porch the lower slopes are good because they overhang and create a cover.  

Pros: 

  • They allow dormers  
  • Overhanging eaves provide protection from water damage  
  • Durable 
  • Bonnet roof allows extra living spac for a small loft 

Cons: 

  • Difficult to construct 
  • More expensive 
  • Need complex materials 
Bonnet Roof

Contact us