Tag: insulation

Advice Center

How to make your home more energy efficient?  

Before you remodel your home or design a new one you should consider investing in energy efficiency, especially during this cost-of-living crisis. You will save energy and money and your home will be more comfortable.  

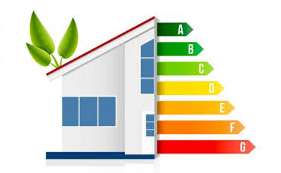
How energy efficient is your home?  

The first step in this process is to find out how much energy your home uses. And what is the most effective way to improve it. If your home has an energy performance certificate, it will help you identify any possible improvements. You can find any current or expired EPC in the UK on the government’s website.  

The main aspects of an energy efficient home –  

There are often 3 main aspects that are crucial when achieving an energy efficient home design, and they are:  

  • Air quality – 

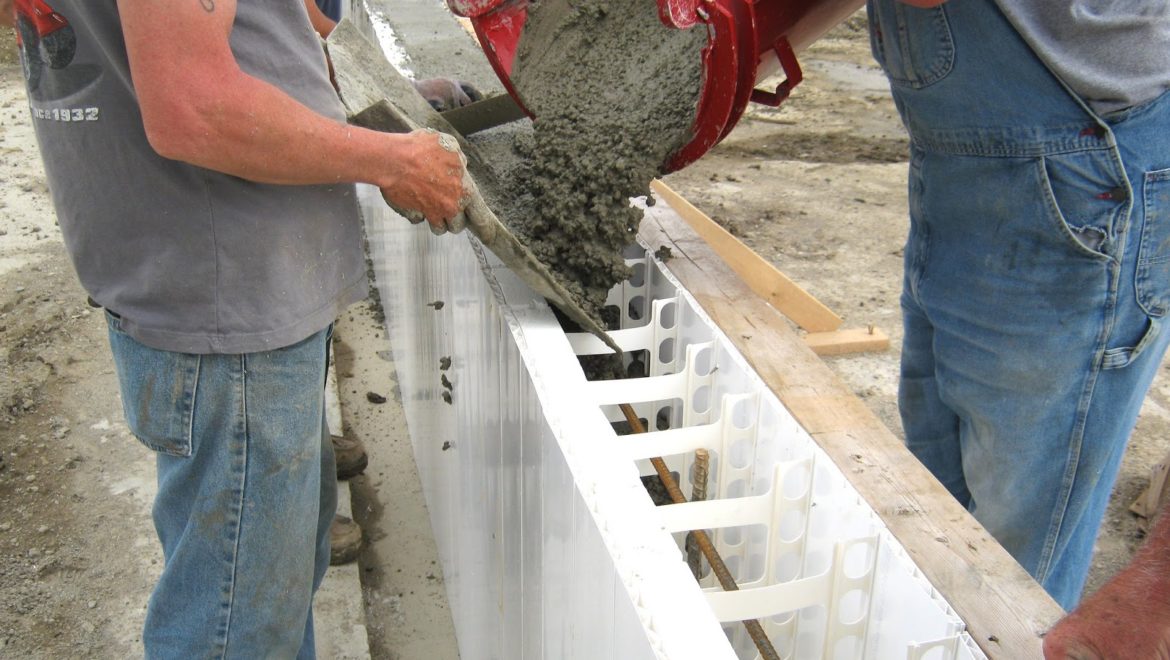
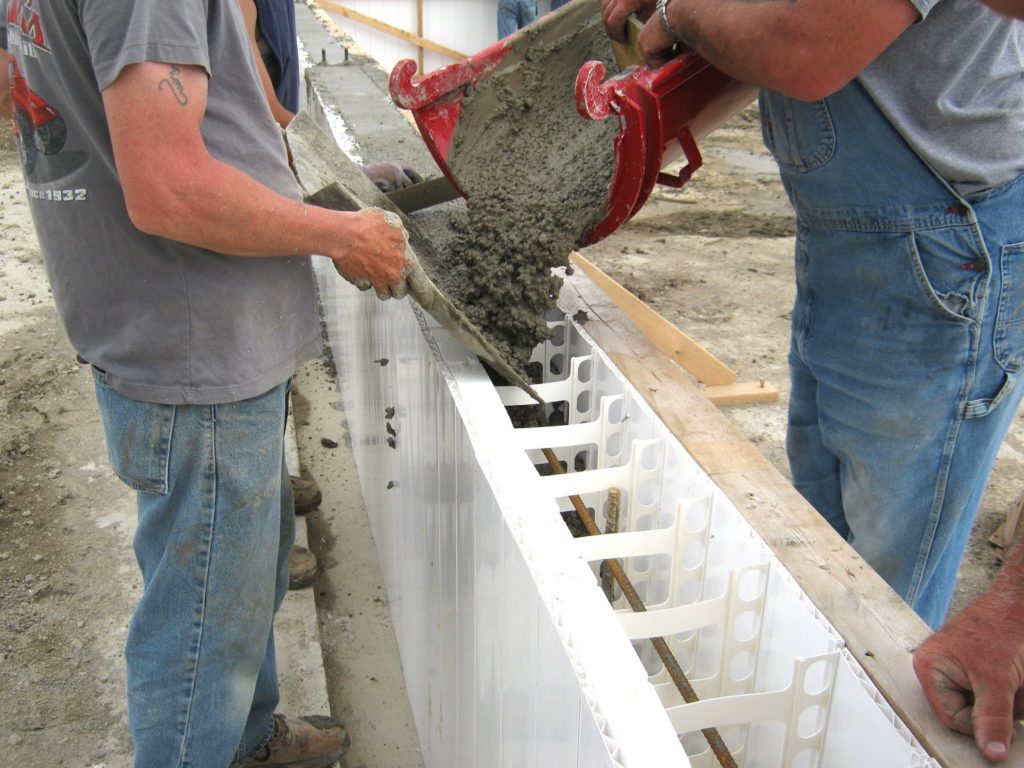
Adding high quality insulation to your home will make it more air tight. The tighter the air the more heat it retains. However, it’s important to install a good ventilation system. This will allow you to remove the moist air that builds up in your home, without losing heat.  
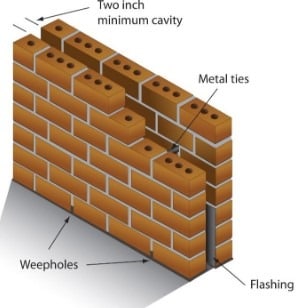
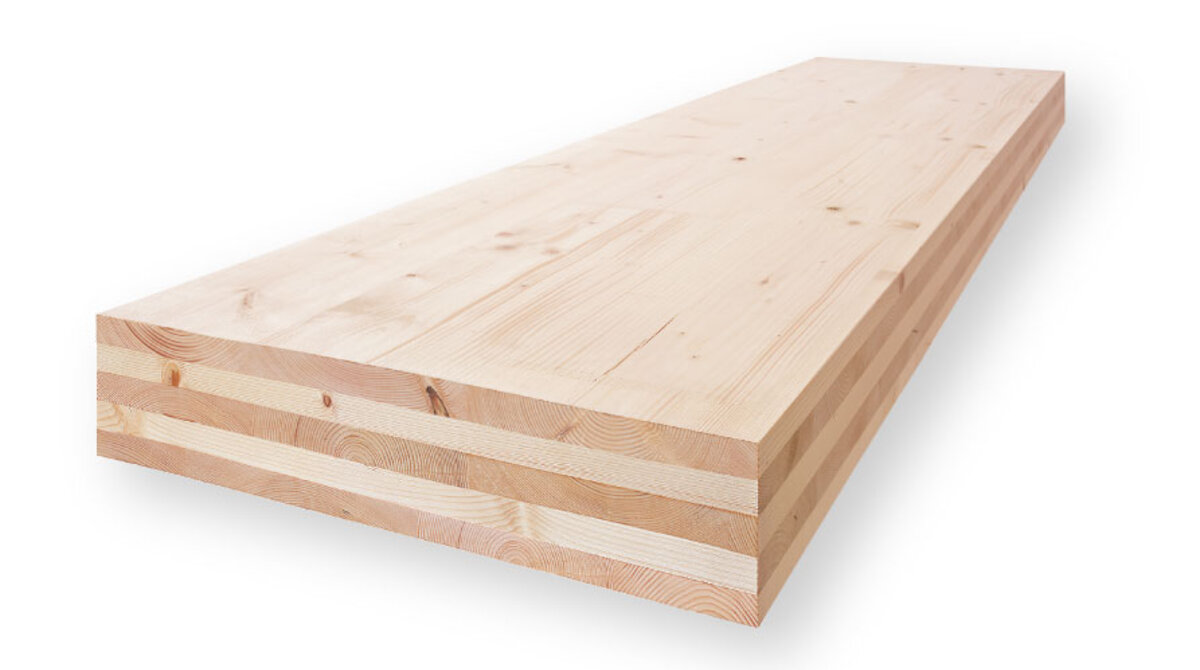
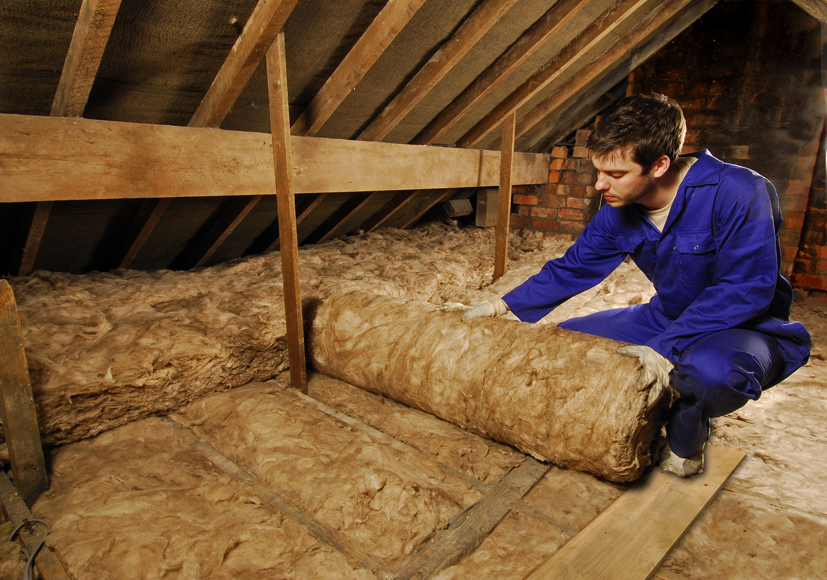
  • Insulation 

Choosing the right insulation is important when it comes to retaining as much heat as possible. There are many effective ways to insulate your home, which can reduce heat loss. For example: cavity wall insulation, floor insulation, windows and doors, solid wall insulation, etc.  

  • Heating and cooling –  

Since the gas prices are increasing homeowners are looking for the best ways to save some money. Once your home is properly insulated you won’t need as much heat to maintain a comfortable temperature. This is a benefit because you will use less oil, gas or electricity.  

Can reducing a home’s energy efficiency help combat climate change?  

Homes that use energy supplied from the burning of fossil fuels are responsible for a large amount of carbon dioxide emissions. This means improving the energy efficiency of a home can reduce the burning fossil fuels.  

Contact us

Materials

All there is to know about a cavity wall

What is a cavity wall?  

A cavity wall is constructed with two separate walls for single wall purposes with some space or cavity between them. They can be described as consisting of two “skins” separated by a hollow space (cavity). The skins typically are masonry, such as brick or cinder block. Masonry is an absorbent material that can slowly draw rainwater or even humidity into the wall. One function of the cavity is to drain water through weep holes at the base of the wall system or above windows.  

What is the purpose?  

The purpose of a cavity wall is to ensure that the inner skin of the wall remains dry and that no moisture penetrates the inside of the building. 

History of the cavity wall – 

Cavity walls existed in Greek and Roman times, but only developed as a component of more recent construction in the 18th and 19th centuries. Even during this time, they were very rare. The use of metal ties to connect the two skins only emerged in the second half of the 19th century and then became more common towards the beginning of the 20th century. In the UK, most new, external masonry walls have been cavity walls since the 1920s.  

Insulation –  

Cavity wall insulation is used to reduce heat loss. This happens by filling the air space with material that inhibits heat transfer. This immobilises the air within the cavity, preventing convection, and can substantially reduce space heating costs.  

During the construction of new buildings, cavities are often filled with glass fibre wool or mineral wool panels placed between the two sides of the wall.

Advantages of cavity walls –  

  • They act as good sound insulators  
  • Economically they are cheaper than solid walls  
  • They also reduce the weights on foundation because of their lesser thickness  
  • Moisture content in outer atmosphere is not allowed to enter because of hollow space between the skin. So, they prevent dampness  
  • Cavity walls give better thermal insulation than solid walls. It is because of the space provided between two skins of cavity walls is full of air and reduces heat transmission into the building from outside. 
Advice Center

An informative step-by-step guide to installing a roof

This step-by-step guide will show you how to install a roof. It will also list tools and items that you would need during this project.  

List of tools required –  

  • Caulk gun 
  • Air compressor 
  • Circular saw 
  • Roof harness  
  • Roofing Nailer 
  • Scaffolding  
  • Stapler  
  • Utility knife  
  • Cordless drill 
  • Tape measure  
  • Chalk line 

List of materials required –  

  • Felt underlay  
  • Asphalt shingles  
  • Roofing nails  
  • Drip edge  
  • Hook blades  
  • Sealant 
  • Waterproof underlay  
  • Staples  
  • Step and dormer flashing  
  • Valley flashing  
  • Vent flashing  

Step 1: installing the ventilation system  

A rafter roll is usually laid across the eaves and is designed to guide fresh air into the roof. It also allows air to circulate around the space to prevent dampness.   

What is a rafter roll? 

A rafter roll is a glass mineral wool roll. Designed for use in warm roofs where the roof is insulated at rafter level. It offers excellent thermal performance.  

Make sure the rafter roll comes out above any pre-installed insulation. If you don’t the insulation will block the airflow.  

Step 2: installing underlay  

To protect the roof against ice, wind, and rain you should install a good underlay. You need to make sure the underlay you have chosen meets the building regulation requirements for your project. So, to install the underlay you should start on the right side of the roof and tack it into place. Depending on your ventilation system, you may need to leave a gap at the ridge of the roof to allow air to circulate effectively.  

Step 3: putting in the battens and tiles  

You will need to determine the first fix point on the roof for your tiles, and that’s where the top of your first batten will sit. In addition, make sure you use the right size timber batten for your roof tiles. Line up the top of the batten with the chalk line and fix with a nail to every rafter. After that, to keep the ridge batten secure you must use batten straps to keep it in place.  

What is a batten?  

A Batten is a small section of timber or steel that provides a means of supporting, positioning, or fixing roof cladding and ceiling sheets. A Tile batten is parallel to the eaves line and at right angles to the rafters to which tiles are fixed

Next, you should lay your first line of tiles across the roof. Then, make sure that you have a minimum of one nail per tile and two nails per tile around the perimeters. You should time from right to left, depending on the interlock of the tile.  

Finally step 4: adding the roof ridge 

You should place your ridge membrane in a straight line across the ridge batten. Once it’s secured all along the ridge, it’s time to screw the ridge tiles to the ridge batten. Finally, when that is completed, you can install a ridge-to-ridge seal to offer extra strength to the ridge.  

Contact us

Architecture & Building, Materials

All there is to know about Cross-laminated timber (CLT)

What is CLT? 

Cross-laminated timber (CLT) is a wood panel product, made from gluing together layers of solid-sawn lumber. They’re usually stacked crosswise at a 90-degree angle and glued into place. Using an odd number of layers is most common.  

Advantages and disadvantages of using CLT 

Advantages –  

  • Eco-friendly.  

Cross-laminated timber is a renewable, green, and sustainable material.

  • Prefabrication.  

Floors or walls made from CLT can be manufactured before reaching the job site. Which decreases lead times and could potentially lower overall construction costs.  

  • Thermal insulation.  

Being made out of multiple layers of wood, the thermal insulation of CLT can be high depending on the thickness of the panel.  

  • CLT is a light building material  

Foundations don’t need to be as large and the machinery required on-site are smaller than those needed to lift heavier materials.  

Disadvantages –  

  • Higher production costs. 

The production of CLT panels requires a large amount of wood and other materials compared to stud walls. 

  • Flammability.  

Wood is very flammable, unlike other building materials such as steel.   

  • Limited track record.  

Cross-laminated timber is relatively new material. So, a large amount of research has been done on Cross-laminated timber. However, it takes time to integrate new practices.  

How much does cross-laminated timber cost?  

In addition, the cost of cross-laminated timber is usually around £30 per metre square. Or on the high end of the price spectrum, you can expect it to cost about £50 per meter square.  

The cost of materials and labour may be lower than the traditional steel or concrete. Cross-laminated timber also reduces the carbon footprint of buildings.  

It is durable?  

The CLT product has a life span of 60 years and there are occupied timber buildings in Europe that are over 700 years old. The key factor in the longevity of a timber structure is the management of moisture during the design stage.


Cross-Laminated Timber MM crosslam - MM Holz

Architecture & Building, Materials

Get to know the pros and cons of Insulated concrete formwork (ICF)

If you’re looking for a quick structural system with impressive energy performance. Then insulated concrete framework could be a great choice for your build project.  

What is ICF? 

ICF is based on hollow blocks or sheet components, usually made from expanded polystyrene, fastened together with metal or plastic connectors. The panels or blocks feature an interlocking profile, so they can be stacked without bonding materials. Concrete is then poured inside to make the structure secure.

Is ICF energy efficient?  

Once the pour is complete, the ICF remains in place to provide a robust layer of thermal insulation. ICF structures also offer very good airtightness, as the concrete pour and insulating formwork combine to create a highly sealed house shell. In addition, the different thicknesses of ICF blocks, with varying insulation depths, are available to help you achieve your target thermal performance.  

Pros and cons of Insulated concrete formwork –  

Pros  

  • Speed of build  

The construction is simple and not labour-intensive. Insulated concrete formwork blocks are very similar to Lego blocks in the way they interlock and stack together.  

  • Durability 

ICF buildings are incredibly structurally sound due to the concrete and steel reinforcement that is incorporated into the walls. The buildings are known to be disaster-proof. 

  • Reduced energy bills  

They are incredibly energy efficient and can easily achieve an A rating. This level of efficiency means less energy is required to heat the home, which reduces the energy bill. Owners that have Insulated concrete formwork buildings have experienced as much as a 60% reduction in their energy bills.  

  • Peace and quite  

The blocks used in construction create thick and solid walls, which noise cannot penetrate. If noise is an issue in your area, or you live in a city but want peacefulness then, ICF maybe your best solution.  

Cons  

  • The walls can be very thick. This can cause limited space in some areas, particularly cities.  

Cost of ICF –  

In addition, depending on the job, the formwork can be inexpensive or expensive. Most Insulated concrete formwork systems on sale cost between £25 and £35 meters squared.  

Contact us

Garage Conversion

Garage conversion 2022: all you should know before you start

Firstly, a garage conversion is one of the quickest and most affordable routes to adding floor space. These types of projects can often be completed in a little over a week. In addition, many people often just use their garages as a place to put their cars or as a storage room. However, maybe it’s a great time to consider converting your garage and making it into a valuable asset.  

Is your garage suitable for a conversion?  

A garage conversion is classed as a change of use, so it will require building regulations approval.  

To comply with building regs your garage conversion must:  

  • Be structurally sound 
  • Have a damp proof course 
  • Have all of the electrics tested 
  • Be moisture proofed, with good ventilation 
  • Have been fire proofed and have escape routes 
  • Have wall, floor, and loft insulation so that its energy efficient 

Will you need planning permission to convert your garage?  

Most garage conversions will usually fall under permitted development, meaning that planning permission is not required. However, it is still best to check with your local authority, because there is a small percentage that will require planning permission.  

If your home is listed or in a conservation area, then it is very likely that you will need planning permission before you can convert your garage.  

Insulating the garage conversion – 

It is important that the new room is warm and energy-efficient. In order to comply with building regs, you will need insulation.  

In addition, the simplest way to add insulation to the walls is with insulated plasterboard fitted to timber battens above the damp-proof course.  

How much will it cost?  

A garage conversion is a relatively low-cost way of increasing your living space. This is because you don’t need to pay for laying new foundations or building new walls and you also may have power.  

For a single garage conversion, you should budget around £20,000 – £30,000 with some variation due to your choice of materials and fittings.  

It is also worth mentioning that a construction material shortage is causing a spike in many building materials.  

Factors that could affect the cost of your garage conversion –  

  • Planning applications 
  • If you use an architect or designer 
  • Whether you need to use a structural engineer 
  • Whether the foundations need to be reinforced 
  • If the ceiling height needs to be raised. You need around 2.2-2.4m of headroom. 
  • If the walls, floors, or roof need to be repaired. It may be cheaper to demolish your garage and start again.  

Contact us

Advice Center

The best 6 insulation types for a loft conversion

Firstly, a loft conversion is a great way to add extra space to your home. As well as, adding an extra room to the house, a well-insulated conversion may also provide savings by reducing the energy bills. It is important to know about and choose the best type of insulation for your home.

Here are the 6 main insulation types:  

Rigid foam (PIR/ PUR)-  

Both PIR and PUR boards are made by mixing chemicals with a blowing agent. However, this forms large rigid blocks which are low density, closed-cell insulation sheets. The gas which is trapped in the closed-cell of the insulation has a very low thermal conductivity.  

Extruded polystyrene –  

So, extruded polystyrene is rigid insulation that has also formed with polystyrene polymer, but manufactured using an extrusion process. . This means that there will be no further movement of the foam. Ensuring that it will retain its final structure and thermal values.  

Mineral wool (glass/ stone) – 

Mineral wool is available in rolls or slabs. It is man-made from a range of materials including, recycled glass and fibers. In addition, mineral wool is a porous material that traps the air, making it one of the best insulating materials. It is also good because it doesn’t fuel fire or propagates flames.  

Multi-foil insulation –  

Multi-foil is thin reflective layers of insulation. The layers are separated by wadding and foam. This insulation is perfect for preventing radiant heat loss.  

Expanded polystyrene –  

Also, expanded polystyrene often known as Styrofoam is produced by the expansion of beads. These beads contain pentane as a blowing agent. In addition, This closed-cell structure provides minimal water absorption and low vapor permanence.  

Phenolic foams –  

Finally, phenolic insulation is made by a process in which plastic foam forms. It creates an insulating core between two flexible layers.  

This insulation is perfect for preventing radiant heat loss.  

Earthwool

Contact us

Mineral wool is available in rolls or slabs. It is man-made from a range of materials including, recycled glass and fibers. In addition, mineral wool is a porous material that traps the air, making it one of the best insulating materials.

Architecture & Building, Materials

Frequently Asked Things About SIP Panels: Get To Know

What is a SIP panel?  

A structural insulated panel (SIP) is a sandwich structured composite. Consisting of an insulating layer of rigid core sandwiched between two layers of structural board, used as a building material.  

The board can be sheet metal, plywood, cement, magnesium oxide board, or oriented strand board. In addition, the core can either be polystyrene foam, extruded polystyrene foam, polyurethane foam or be composite honeycomb.  

How sustainable are SIPs?  

Structural insulated panels are one of the most environmentally responsible building systems available. They are constructed offsite and the elements are fully manufactured in a controlled environment. This minimises the loose materials sent to the site you are balancing the risk of waste. Also, all of the materials used in the manufacture and construction are recyclable.  

Installing and longevity of SIP panels –  

When using SIP panels, the build speeds are a lot quicker than the normal construction methods. This is due to the number of elements you need for a build. The panels just need slotting together, once they have need delivered.

The life span of structural insulated panels usually lasts around 60+ years. This is because they are a high-performing system that is extremely strong.  

Are SIPs cost-effective?  

SIP panels are usually the same or sometimes less expensive than using other building systems. They are known to be 90% more energy-efficient than a traditional home. This is because of all of the insulation and airtightness they provide. The panels are also a cheaper option because there will not be many construction and labour costs.  

Advantages and disadvantages –  

SIP panels have many pros and cons, and they are the type of product you should investigate before committing to them on your project.  

Advantages –  

  • They are considered to be up to 6 times stronger than a timber frame.  
  • Can me manufactured off site – this means the build will be less costly and will take less time to construct.  
  • Fire resistant – they have tested to offer 73 minutes of resistance, which exceeds British fire safety regulation.  
  • Highly thermal – they have also tested to outperform fibre insulation. 

Disadvantages –  

  • Require additional ventilation – this is because of the heat trapped inside. To avoid built up condensation you need to use the vents.
  • It is harder for changes to be made once you have decided on the design of you SIP home.
  • Need additional airflow sources – because of the tight seal you need more airflow. If not, the walls can become damp, and even mouldy.  
  • Relatively new to the UK – therefore, finding professional builders with experience can be hard.  
SIP panel

Contact us