Tag: rafters

Architecture & Building

Understanding All Of The Details Of A Roof

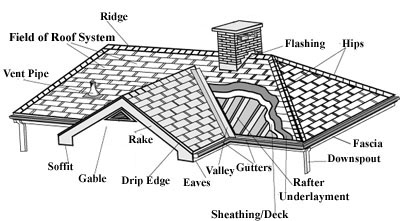
When it comes to the roof of your home, there are quite a few components. Here you can gain an understanding of all of the details that make up a roof.  

What is a ridge?  

Firstly, the ridge is defined as the highest point on a roof, often referred to as the peak. It is a horizontal line running the length of the roof where the two planes meet. 

A ridge beam is a necessary structural member that carries half of the roof load and must be used when building roofs with slopes less than 3/12.  

 If you are thinking of installing a loft conversion, you must measure from the floor to the ridge height to see if you have a minimum head height of 2.2 m.  

What is a hip?  

A hip roof has no vertical ends. It is sloped on all sides, with the slopes meeting in a peak. The hip is the external angle at which adjacent sloping sides of a roof meets.  

The hip provides the ideal protection from the weather, like heavy rain, snow, and high winds. This is because the sides are sloped towards the ground so the weather can slide off and makes the building more stable.  

Rafters –  

A rafter is a structural component that is used as a part of the construction. Typically, it runs from the ridge or hip of the roof to the wall plate of the external wall. Rafters contain two main outer beams which support the structure. In addition, they are usually laid side-by-side, providing a base to support roof decks and coverings. 

Valley –  

A valley is a gutter-like valley that runs between two sloped sections. They are used so that the rainwater has somewhere to escape.  

Although just like gutters, valleys undergo a fair amount of wear over time. They can leak, rust, and get blocked up; however, the repairs are a common situation and easy to fix.  

They are typically made of lead, concrete, or fiberglass. Although, aluminum is now growing in popularity, as a lightweight and rust-resistant alternative to older iron/ steel valleys.  

Rakes –  

The rake refers to the slanting edge of a gable roof at the end wall of the house. This f is most common in colder climates and consists of two sections sloping in opposite directions from the peak to allow for the best flow of water off the roof.  

They are important because they help keep your roof dry and they serve the important function of preventing water from getting into the fascia.  

Shingles –  

Finally, shingles are coverings consisting of individual overlapping elements. These elements are typically flat, rectangular shapes laid in courses from the bottom edge of the roof up. With each course overlapping the joints below.  

Roofing Terms | Brothers Roofing NJ

Contact us

Architecture & Building

Find Out The Journey Of Building A Carport

Building a carport is a great way of providing protection for your vehicle, whilst increasing the value and appeal to your home. 

Here are the steps to build an enclosed carport.  

Step 1: Preparation to start the carport –  

The first thing you should do is check with your local planning authority to make sure your proposed project is up to code. Once you have been approved by the planning authority you can then prepare the carport to be enclosed. 

 You should start by clearing the area that the carport will be placed. Then you will need to pour a concrete slab to support the new room. However, before you pour the slab you need to make sure that you have measured how much space is required. For an average car, you need to measure at least 4.9 metres. It is best to make a wooden box to create a template for the concrete to set in once it’s poured. Try to ensure that the concrete slab is level with the rest of your house.  

Step 2: Purchase the necessary building materials –  

You can build carports from wood, metal, and sometimes brick, depending on the style you want and if you want it to match the materials on your home.  

When choosing the materials, you should keep in mind the climate of where you live. Different materials and designs may be more or less appropriate for where in the world you live. For example, lumber may be more appropriate for drier climates. They are also known to be more secure and durable. 

Step 3: start building the walls –  

Now you need to measure the size of the carport and start building the frames for the walls. To secure the walls to the carport you’ll build a simple rectangular box. If you are not creating an enclosed carport then you would move on to the roof. Whereas, if your project is an enclosed carport you will need to add stud walls. You will also need to frame openings for any windows or doors you want to include.  

Then you should secure the frames and the walls to the concrete floors by bolting them down.  

Step 4: building the roof –  

The next step is to fasten the rafters to the side beams. Rafters that will support the roof will be fastened to the wooden box. You should then fasten plywood roof boards to the rafters  

Step 5: Check the stability of the structure –  

When the roofing of your carport is complete, you should take the time to check the stability of the structure. If everything is done properly the carport should be quite solid. If there is any movement when you are checking the stability, you will have to add structure braces as reinforcement.  

Step 6: Finishing touches to the carport-  

For the finishing touches of your carport, you need to caulk the plywood roof seams. This is to keep the elements out, it is important to cover the roof with tar paper to create a waterproof surface, before shingling over it. Then you should fasten the shingles on top of the plywood roof. After that, you can then stain or paint the wood elements, increasing the longevity in the process. Once you have finished all the touches your carport is ready to go.  

Contact us